It only took three days for my website, LoudMoneyMoves, to get the green light from Google Adsense.
For context, I started this site back in December 2020 and had already published more than 275 articles before I ever applied.
I held off on display ads for a long time because I didn’t want random ads messing up the look and feel of my site.
But once I saw how much creators were earning from display ads, I had a little reality check.
If your site is getting real traffic, those ads can become a solid stream of income.
So if you are thinking about applying for Google Adsense approval, here are the things you will want to take care of first.
These are the steps that helped me get accepted fast, and they can help you set yourself up the same way.
How My Website Made Money Before Google Adsense Approval
For the first few years of running my site, it was already bringing in a really healthy income even without display ads.
Most of that came from affiliate links and the digital products I created.
As an Amazon Associate and Influencer, I regularly send people to my Amazon storefront, and those commissions add up.
I also share apps and courses I use myself, so recommending them on my blog feels natural and it brings in another steady stream of income.
And since my site drives a lot of people to my YouTube channel, that turned into another layer of revenue since I’m monetized over there.
So by the time I decided to add Google display ads into the mix, it just felt like the next logical step.
Things I Did to Get Approved for Google AdSense
My site was approved in just three days. Here are the key things you’ll want to do to give your website the best chance of getting approved.
1. Set Up Core Pages
One thing that Google wants to see is that there is a real person behind your website, not a bot. I made sure I had three basic but important pages live and linked in my header and footer before I applied.
- About Us Page – This is where I briefly shared who I am, what my site is about, and who it’s for. I kept it simple, added a photo, and wrote it in my own voice so it didn’t look like generic AI text.
- Contact Us Page – I added a basic contact form and an email address so visitors (and brands) could actually reach me. This shows Google there’s a real human running the site and that users have a clear way to get support.
- Privacy Policy Page – This page explains how I collect and use data on my site (cookies, analytics, email forms, etc.). You can generate a free privacy policy using tools like Termly or PrivacyPolicies.com, and then customize it slightly to match your site.
These pages help to establish credibility of your site and make Google much more comfortable approving you for AdSense.
Looking for other ways to make money from home?
Read more about FreeCash, including how I earned $50 instantly with FreeCash!
2. Added a Navigation Menu
For AdSense, your site should feel simple, clean, and easy to move around, both for real people and Google’s reviewers.
So having a clear navigation menu and website layout that doesn’t confuse visitors is essential.
I’ve heard of a lot of bloggers getting denied into the Adsense program just because they didn’t have a proper navigation menu.
At the top of my site, I use a main navigation bar with a drop-down menu that sends people straight to my main categories like side hustle ideas and Pinterest.
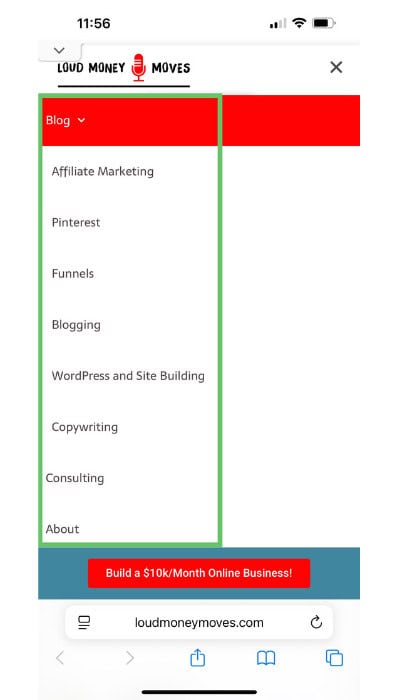
I also included the same links on the footer of each page.
This makes it super easy for someone to land on my site and instantly find the type of content they care about, instead of clicking around randomly and bouncing.
The goal is to have your whole website experience feel smooth and user-friendly.
Suggested Read: How to Turn Your Content into Cash Flow
3. Create Original and High Quality Content
One of the stated Google Adsense requirements is to have original, high quality content. The good news is your articles don’t need to be 3,000-word monsters anymore.
Writing a clear 800–1,000 word blog post that answers the question someone searched for is more than enough, as long as it’s helpful.
I make sure each post has a clear topic, simple headings, and a straight-to-the-point explanation so readers get what they came for without scrolling forever.
I also avoid cranking out AI garbage blog posts. I use AI as a writing assistant to speed up my process, not to create generic content.
4. Submitted My SiteMap to Google
Another thing I did was make sure Google could actually find and index my content by submitting my sitemap.
On my WordPress site, I use the RankMath plugin, which automatically generates my sitemap for me and connects it with Google.
So I don’t have to manually upload files or paste a bunch of URLs.
All I really had to do was set it up once, make sure the sitemap was enabled, and then connect my site to Google Search Console.
This way Google could start crawling my pages properly.
This step doesn’t magically guarantee AdSense approval.
But it does help Google understand your site structure, index your posts faster, and see that your blog is a real, active website and not just an empty shell.
Suggested Read: How to Become an Amazon Influencer and Get Paid for Reviews
5. Meet AdSense Program Policies
The last big thing I focused on was making sure my site actually followed Google’s AdSense program policies.
Before I applied, I went through their policy page.
I double-checked that my content wasn’t in any restricted or “risky” categories, and that I wasn’t doing anything like copyright infringement, clickbait, or misleading claims.
I also made sure things like my privacy policy, cookie banner, and overall user experience lined up with what Google expects from real, trustworthy websites.
If you haven’t read them yet, take a few minutes to scan the official AdSense Program Policies.
Final Thoughts
Getting approved for Google AdSense doesn’t have to be scary or complicated.
It’s really about showing Google that you run a real, helpful, and trustworthy website.
If you focus on solid content, a clean layout, clear navigation, and basic pages like your About, Contact, and Privacy Policy, you’re already ahead of most new bloggers.
Add in things like a sitemap, cookie banner, and policy compliance, and you make it much easier for AdSense to say “yes” to your application.
If you’re ready for your next step in earning online, check out my next post where I break down exactly how to make money posting on Facebook.