Imagine being able to whip up beautifully designed Pinterest pins in seconds that would normally take you hours to do.
Would that help you stick to your Pinterest marketing strategy?
I bet it would!
Well, that’s one reason why creating Canva Pinterest templates can be so beneficial to your success on Pinterest. If you’re leveraging Pinterest for business, then staying consistent on the platform will help you:
- Build Brand Awareness
- Reach New Audiences
- Gain High Quality Leads
- Drive More Sales to Your Business
The good news is you don’t have to be a professional graphic designer in order to use Canva.
Unlike Adobe, Canva makes it super easy for business owners like you and I to quickly create stunning graphics for social media.
In this tutorial, you’ll learn how to easily create customizable Canva Pinterest templates that will help you save time creating click worthy pins!
Take the AI Challenge Kickstart! Learn how to create AI-Assisted Digital Products to sell!
Can You Sell Canva Templates on Pinterest?
Yes, you can sell Canva templates as long as you stick to Canva’s permitted usage terms. Many online business owners including bloggers and Etsy sellers leverage Pinterest to promote and sell their template designs.
So if you’re looking to start a passive income side hustle selling Canva templates, then Pinterest is a good place to start!

That’s what Nadalie does with her Pin Template Starter Kit.
She uses her blog to promote her Canva Pinterest templates, which she then pins to Pinterest for free traffic and sales!
Plus, what better place to market your Pinterest pin templates then on the very same platform that people will be using it on!
Nadalie also teaches you how to design click worthy pins in Canva. If you feel you need extra help with pin design, then check out her Next Level Pin Designs course.
3 Steps to Create Pinterest Templates in Canva
Whether you’re creating Canva Pinterest templates to use in your own business or plan to sell them as your next side hustle, this tutorial will help you create them!
1. Sign Up for a Canva Account
If you haven’t done so already, then you’ll want to sign up for a free Canva account to get started. You won’t need the Canva Pro account to do this, unless you want access to unlimited premium elements and stock photos.
I personally pay for the Pro account since I use Canva to create graphics for my social media profiles and my blog.
Here’s a quick tip: If you plan to sell your Pinterest pin templates, a good best practice is to only use free Canva elements and fonts.
That way, when someone purchases your template, they can customize it in their free account without having to worry about purchasing additional premium elements.
2. Select Optimal Pinterest Template Size
Pinterest recommends using a 2:3 ratio when it comes to optimal pin size, so we’ll stick with that guideline! With this in mind, our Pinterest template size will be the recommended 1000 x 1500 pixels.
Anything longer than that may get cut off in the Pinterest feed, and we wouldn’t want that.
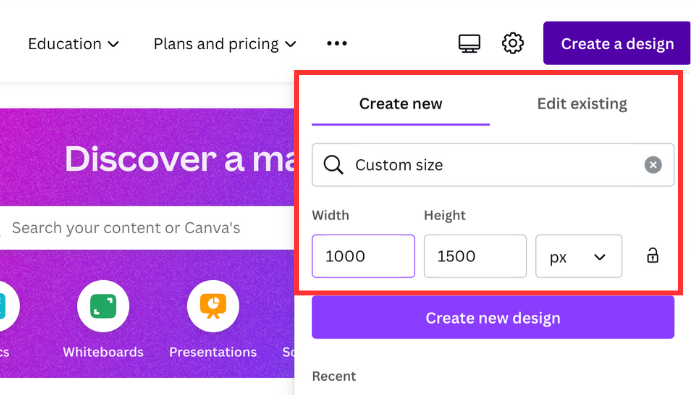
You can manually input these dimensions using the Canva ‘custom size’ feature, or type ‘Pinterest’ in the search bar and scroll down to the optimal size.
This will take you to a blank Canva template where you’ll design your pin templates.
3. Create a New Pin Design
Creating pin designs can seem intimidating at first but once you learn about these next tips and tricks, it’ll feel like a piece of a cake!
So if you’re feeling a bit anxious don’t worry. This quick guide will help ease your nerves!
That reminds me. You may want to save this pin so you can come back to this tutorial later on when you need it!

Canva Pin Template Design Tips
Ok, so at this point you have a fresh new Canva template to work with, optimally sized at 1000 x 1500 pixels. Here are the main things you want to take note of when designing your Pin templates.
- Customize with ‘Frames’ – This can be found by going to the ‘elements’ tab and then entering ‘frames’ in the search bar. The frames feature will enable you to drag and drop images into the chosen ‘frame,’..making it easy to switch images in and out. These are essential to creating Pinterest templates!
- Larger Font – This is where you write your catchy headline that grabs the attention of your audience.
- Smaller Font – This is where you write your subheading that reaffirms the headline and creates further curiosity.
- Stock Images – Canva Pro users have access to unlimited stock images. If you don’t have this type of account then purchase bulk stock images on sites like Depositphotos™, or even take your own pictures!
- Don’t Reinvent the Wheel – Search Pinterest for pins in your niche that are doing well and use them as inspiration for your designs. This doesn’t mean to outwardly copy or steal designs. That’s a big no-no!
- Font Combinations – Use Canva’s suggested font combinations when adding text to keep things easy peasy.
- Add Space for Website – Most all Pinterest creators like to add their website somewhere on the pin image for added visibility. I normally place this at the bottom of my pin designs.

You can continue adding pages and creating new pin template designs as you feel necessary. If you’re still feeling stuck and want additional help, then try out Nadalie’s design course I mentioned earlier in this post.
I have access to the course since I’m a student of her Pinterest Popular course. Nadalie does a great job with showing you how to design a variety of different pins for various marketing objectives.
Brand Kit (Optional)
This is optional but it will make creating new Canva Pinterest templates much faster! If you’re a Canva Pro user, you’ll have access to the Brand Kit feature.
This is where you’ll be able to store your brand logo, colors, and fonts. You can save your branded templates there and access them when needed.

This comes in handy especially if you use Canva to create graphics for other social media sites or for your blog. You won’t have to look up optimal dimensions over and over again for each platform you post on!
Again, this is completely optional. As the title of this post suggests, this tutorial is for creating free Pinterest templates in Canva.
Share Your Pinterest Canva Template
Now that you learned how to make Pinterest templates, it’s time to export and share it. You can do this easily by going to the ‘share’ tab right from within the design dashboard.
Scroll down to the ‘more’ option and then go to ‘template link.’
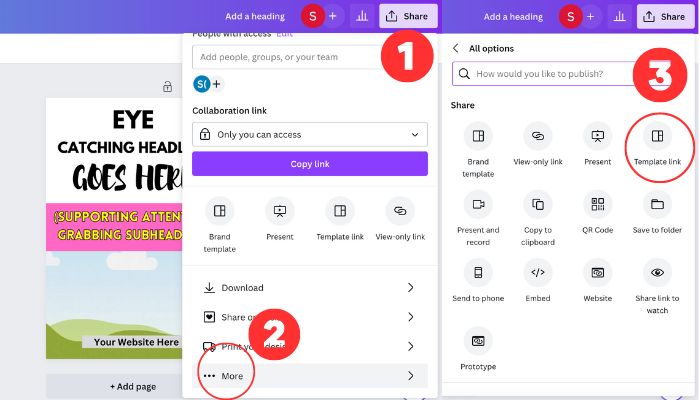
Similar to Google Docs, anyone with the link can use the design as a template and download it to their Canva account. Sign-in is required in order to access the shared Canva Pinterest template.
You can also share your template and give limited access by providing an email address or name under the ‘share’ tab.
From there, you decide whether someone can edit the file, view only, or make a comment on the file. This is a good option for those who use a Pinterest VA or manager to help pin on Pinterest.
Conclusion
I hope you enjoyed this tutorial on creating customizable Canva Pinterest templates. Use the templates for yourself or start a new side hustle on Pinterest selling your pin templates for extra cash!